提示下,编译MySQL 8.0版本,需要gcc版本5.3.0以上才行。我这次的编译环境是ubuntu 18.04,其gcc版本是7.4。
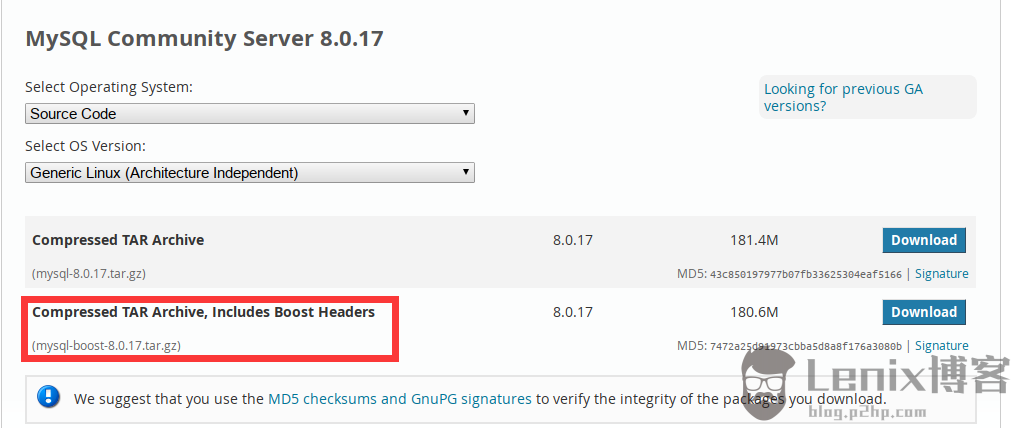
首先,下载带boost代码的MySQL源码包,在官网下载页面有相应的提示:

解压缩后,就可以开始编译了。首先,指定编译的选项:
[root@ubuntu]# cd /opt/src/mysql-8.0.17/
cmake . \
-DWITH_BOOST=/opt/mysql-8.0.17/boost/ \
-DCMAKE_INSTALL_PREFIX=/usr/local/mysql-8.0.17 \
-DMYSQL_DATADIR=/data/mysql \
-DWITHOUT_CSV_STORAGE_ENGINE=1 \
-DWITHOUT_BLACKHOLD_STORAGE_ENGINE=1 \
-DWITHOUT_FEDERATED_STORAGE_ENGINE=1 \
-DWITHOUT_ARCHIVE_STORAGE_ENGINE=1 \
-DWITHOUT_NDBCLUSTER_STORAGE_ENGINE=1 \
-DFORCE_INSOURCE_BUILD=1 \
-DCMAKE_CXX_COMPILER=/usr/local/bin/g++ \
-DCMAKE_C_COMPILER=/usr/local/bin/gcc
在上面的参数中,我把不常用的引擎直接给禁用了,读者们若有需要个别引擎可自行删除对应选项即可。而DEBUG、SSL等几个选项则建议不要禁用。 …
接下来就是执行 make && make install ,顺利的话就完成编译并安装了。如果编译错误,则删除CMakeCache.txt文件后解决对应错误,重新编译即可。
编译完后看到的MySQL版本号就是这样的了:
[root@ubuntu]# /usr/local/mysql-8.0.17/bin/mysqld --verbose -V
/usr/local/mysql-8.0.17/bin/mysqld  Ver 8.0.17 for Linux on x86_64 (Source distribution)
有没有感觉有点酷酷的,嘿。
添加mysql用户 :
shell> groupadd mysql8
shell> useradd -r -g mysql8 -s /bin/false mysql8
初始化数据:
sudo /usr/local/mysql-8.0.17/bin/mysqld --defaults-file=/etc/mysql/mysql8.conf.d/mysqld.cnf --pid-file=/var/run/mysqld8/mysqld.pid --initialize-insecure --user=mysql8
#使用时--initialize-insecure,不会root生成密码. 使用--initialize了 “ 默认安全 ”安装(即包括生成随机初始的 root密码)。在这种情况下,密码标记为已过期,您需要选择一个新密码。
启动mysql
sudo /usr/local/mysql-8.0.17/bin/mysqld --defaults-file=/etc/mysql/mysql8.conf.d/mysqld.cnf --daemonize --pid-file=/var/run/mysqld8/mysqld.pid
附 mysql 8.0 的my.cnf配置
#
# The MySQL database server configuration file.
#
# You can copy this to one of:
# - "/etc/mysql/my.cnf" to set global options,
# - "~/.my.cnf" to set user-specific options.
#
# One can use all long options that the program supports.
# Run program with --help to get a list of available options and with
# --print-defaults to see which it would actually understand and use.
#
# For explanations see
# http://dev.mysql.com/doc/mysql/en/server-system-variables.html

# This will be passed to all mysql clients
# It has been reported that passwords should be enclosed with ticks/quotes
# escpecially if they contain "#" chars...
# Remember to edit /etc/mysql/debian.cnf when changing the socket location.

# Here is entries for some specific programs
# The following values assume you have at least 32M ram

[mysqld_safe]
socket		= /var/run/mysqld8/mysqld.sock
nice		= 0

[mysqld]

#skip-grant-tables
#
# * Basic Settings
#
user		= mysql8
pid-file	= /var/run/mysqld8/mysqld.pid
socket		= /var/run/mysqld8/mysqld.sock
port		= 3308 #我这里是多个版本共存,这里用的是3308,如果你只有一个版本,可以用3306
basedir		= /usr/local/mysql-8.0.17
datadir		= /home/mysql8
#datadir		= /data/mysql
tmpdir		= /tmp
lc-messages-dir	= /usr/local/mysql-8.0.17/share
skip-external-locking
character-set-server=utf8mb4
collation-server=utf8mb4_general_ci
#language        = /usr/local/mysql-8.0.17/share/english
#
# Instead of skip-networking the default is now to listen only on
# localhost which is more compatible and is not less secure.
bind-address		= 127.0.0.1
#
# * Fine Tuning
#
key_buffer_size		= 16M
max_allowed_packet	= 16M
thread_stack		= 192K
thread_cache_size       = 8
# This replaces the startup script and checks MyISAM tables if needed
# the first time they are touched
myisam-recover-options  = BACKUP
#max_connections        = 100
#table_open_cache       = 64
#thread_concurrency     = 10
#
# * Query Cache Configuration
#
#
# * Logging and Replication
#
# Both location gets rotated by the cronjob.
# Be aware that this log type is a performance killer.
# As of 5.1 you can enable the log at runtime!
general_log_file        = /var/log/mysql8/mysql8.log
#general_log             = 1
#
# Error log - should be very few entries.
#
log_error = /var/log/mysql8/error8.log
#
# Here you can see queries with especially long duration
#slow_query_log		= 1
#slow_query_log_file	= /var/log/mysql/mysql-slow.log
#long_query_time = 2
#log-queries-not-using-indexes
#
# The following can be used as easy to replay backup logs or for replication.
# note: if you are setting up a replication slave, see README.Debian about
#       other settings you may need to change.
#server-id		= 1
log_bin			= /var/log/mysql8/mysql8-bin.log
binlog_expire_logs_seconds=140000
max_binlog_size   = 100M
#binlog_do_db		= include_database_name
#binlog_ignore_db	= include_database_name
#
# * InnoDB
#
# InnoDB is enabled by default with a 10MB datafile in /var/lib/mysql/.
# Read the manual for more InnoDB related options. There are many!
#
# * Security Features
#
# Read the manual, too, if you want chroot!
# chroot = /var/lib/mysql/
#
# For generating SSL certificates I recommend the OpenSSL GUI "tinyca".
#
# ssl-ca=/etc/mysql/cacert.pem
# ssl-cert=/etc/mysql/server-cert.pem
# ssl-key=/etc/mysql/server-key.pem
参考
- 2.9.4 MySQL Source-Configuration Options,https://dev.mysql.com/doc/refman/8.0/en/source-configuration-options.html
- Installing Percona Server for MySQL 8.0.15-5,https://www.percona.com/doc/percona-server/5.7/installation.html
- Centos7升级gcc学习笔记 https://www.cnblogs.com/highway-9/p/5628852.html
- https://dev.mysql.com/doc/refman/8.0/en/data-directory-initialization.html
- http://imysql.com/2019/05/04/%e7%8e%a9%e8%bd%acmysql-8-0%e6%ba%90%e7%a0%81%e7%bc%96%e8%af%91.shtml
原创文章,转载请注明:来自Lenix的博客,地址 https://blog.p2hp.com/archives/6618


