Middleware is a crazy popular mechanism in coding these days. Laravel has implemented it for its router, giving you the possibility to run actions on a request before and after it is executed. Likewise the web application framework for Node Express.js has also a middleware implementation with middleware libraries for different things for example serving static files, log requests etc.
How middleware is implemented in Laravel
Whenever a request is made to a Laravel application it is run through a pipeline of middleware. A demonstration is in order. Queue my amazing Photoshop skills.
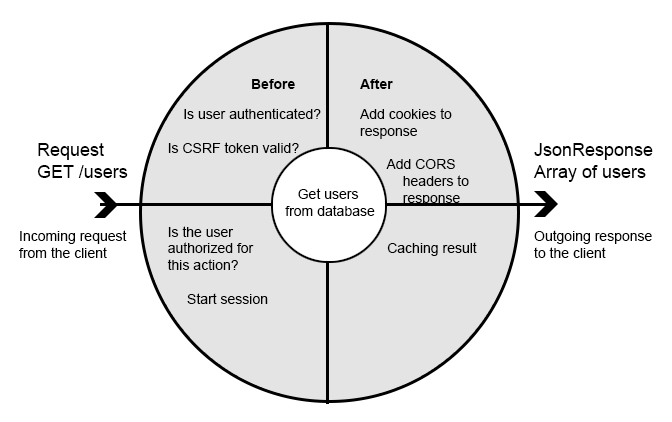
Imagine you are making a request GET /users to an API. The actual action of GETting users from the database is displayed as the white circle in the middle. But before this can happen we want to run some middleware. As pictured there are two types of middleware: (1) before and (2) after. Before middleware is run against the request before the execution of the actual action it requests (duh). Examples of this could be checking if the user is authenticated and authorized, if the CSRF token sent with the request is valid etc.
Once the before middleware has run, it is time for the actual action. We get an array of users from the database to send back to the client. But before the response reaches the client we want to do some post-action work on it. This is after middleware. Examples could be adding CORS headers, adding cookies, or caching the result. If we implemented caching after middleware, we could then implement some before middleware to check for a cached version of the resource before actually getting it from database.
So it is a router thing?
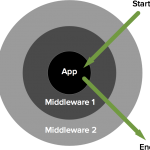
Not at all! The concept is really versatile if you think about it, and it can be implemented in many different scenarios.
Use case: an uploader
At Traede we are currently implementing middleware in our uploader functionality. Our users upload many product pictures, user profile pictures etc. All these we store in our CDN hosted by Cloudinary. But before we actually upload the picture to Cloudinary we do some quick work, and after the image has been uploaded we do some clean up.
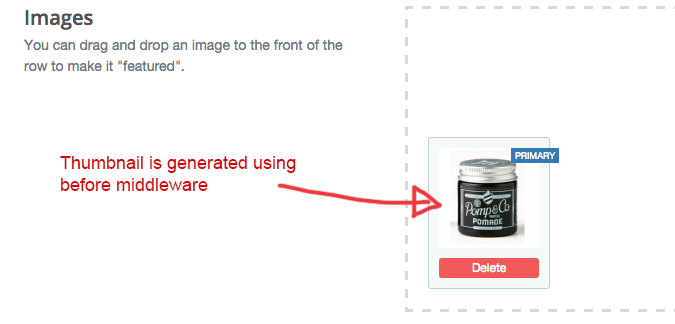
This is how our uploader looks in Traede. The user drops a file in the drop area and it displays a small box with a thumbnail and the status of the image. The thumbnail is created using thumbnail middleware. Our middleware pipeline runs like this
- Before middleware: generate thumbnail
- Actual action: upload image to Cloudinary
- After middleware: clean up temporary files

There are probably many more middleware classes to be implemented in our uploader. But, for now, these are the ones we use. This was just a simple demonstration of how epic middleware can obviously be.
Gotcha! Now gimme middleware!
So, how do you actually implement a general middleware solution? Introducing: Onion. A small standalone library, with a clever name might I add, that will give you the power to implement middleware in any situation.
Some terminology of the Middleware Onion
- The actual action (e.g. upload to Cloudinary) is called the core of the onion
- Middleware classes are called layers (Onion layers - clever, no?)
A quick example
The below example has two different middleware layers: a before and an after. The object we pass through our pipeline is a simple object with an array. Each actor that interacts with the object will log itself in the array.
class BeforeLayer implements LayerInterface {

    public function peel($object, Closure $next)
    {
        $object->runs[] = 'before';

        return $next($object);
    }

}

class AfterLayer implements LayerInterface {

    public function peel($object, Closure $next)
    {
        $response = $next($object);

        $object->runs[] = 'after';

        return $response;
    }

}

$object = new StdClass;
$object->runs = [];

$onion = new Onion;
$end = $onion->layer([
                new AfterLayer(),
                new BeforeLayer(),
                new AfterLayer(),
                new BeforeLayer()
            ])
            ->peel($object, function($object){
                $object->runs[] = 'core';
                return $object;
            });

var_dump($end);
The result of this will be
..object(stdClass)#161 (1) {
  ["runs"]=>
  array(5) {
    [0]=>
    string(6) "before"
    [1]=>
    string(6) "before"
    [2]=>
    string(4) "core"
    [3]=>
    string(5) "after"
    [4]=>
    string(5) "after"
  }
}
As you can see all the before middleware will run before the core, and likewise all the after middleware will run after. As you have probably noticed it does not matter in which order we add the layers to the onion. So how do we actually define what to run before and what to run after?
class Layer implements LayerInterface {

    public function peel($object, Closure $next)
    {
        // Everything run before the execution of
        // $next, can be considered before middleware

        $response = $next($object);

        // Everything run after the execution of
        // $next, can be considered after middleware

        return $response;
    }

}
The function $next we pass to all layers is the function that will pass the object down through our pipeline. All actions that are run before $next in a layer class will be run before the core function, and is therefore before middelware. Likewise, whatever is done after $next is next middleware. Take a look at the layers we previously used in our example.
class BeforeLayer implements LayerInterface {

    public function peel($object, Closure $next)
    {
        $object->runs[] = 'before';

        return $next($object);
    }

}

class AfterLayer implements LayerInterface {

    public function peel($object, Closure $next)
    {
        $response = $next($object);

        $object->runs[] = 'after';

        return $response;
    }

}
And that’s a wrap
That is it for now folks. Go to Onion's github repo to get started middlewaring your world. Have fun!
最后更新于 2021年5月6日